Crossref and the Public Knowledge Project (PKP) have been working closely together for many years, sharing resources and supporting our overlapping communities of organisations involved in communicating research. Now we’re delighted to share that we have agreed on a new set of objectives for our partnership, centred on further development of the tools that our shared community relies upon, as well as building capacity to enable richer metadata registration for organisations using the Open Journal Systems (OJS).
To mark Crossref’s 25th anniversary, we launched our first Metadata Awards to highlight members with the best metadata practices.
GigaScience Press, based in Hong Kong, was the leader among small publishers, defined as organisations with less than USD 1 million in publishing revenue or expenses. We spoke with Scott Edmunds, Ph.D., Editor-in-Chief at GigaScience Press, about how discoverability drives their high metadata standards.
What motivates your organisation/team to work towards high-quality metadata? What objectives does it support for your organisation?
Our objective is to communicate science openly and collaboratively, without barriers, to solve problems in a data- and evidence-driven manner through Open Science publishing. High-quality metadata helps us address these objectives by improving the discoverability, transparency, and provenance of the work we publish. It is an integral part of the FAIR principles and UNESCO Open Science Recommendation, playing a role in increasing the accessibility of research for both humans and machines. As one of the authors of the FAIR principles paper and an advisor of the Make Data Count project, I’ve also personally been very conscious to practice what I preach.
On behalf of the Nominating Committee, I’m pleased to share the slate of candidates for the 2025 board election.
Each year we do an open call for board interest. This year, the Nominating Committee received 51 submissions from members worldwide to fill five open board seats.
We have four large member seats and one small member seat open for election in 2025. We maintain a balanced board of 8 large member seats and 8 small member seats. Size is determined based on the organization’s membership tier (small members fall in the $0-$1,650 tiers and large members in the $3,900 - $50,000 tiers).
In 2022, we wrote a blog post “Rethinking staff travel, meetings, and events” outlining our new approach to staff travel, meetings, and events with the goal of not going back to ‘normal’ after the pandemic and said that in the future we would report on our efforts to balance online and virtual events, work life balance for staff, and track our carbon emissions. In December 2024, we wrote a blog post, “Summary of the environmental impact of Crossref,” that gave an overview of 2023 and provided the first report on our carbon emissions. Our report on 2023 only just made it into 2024, so we are happy to report on 2024 a little sooner in the year.
Registering your DOI records using OJS version 3.4
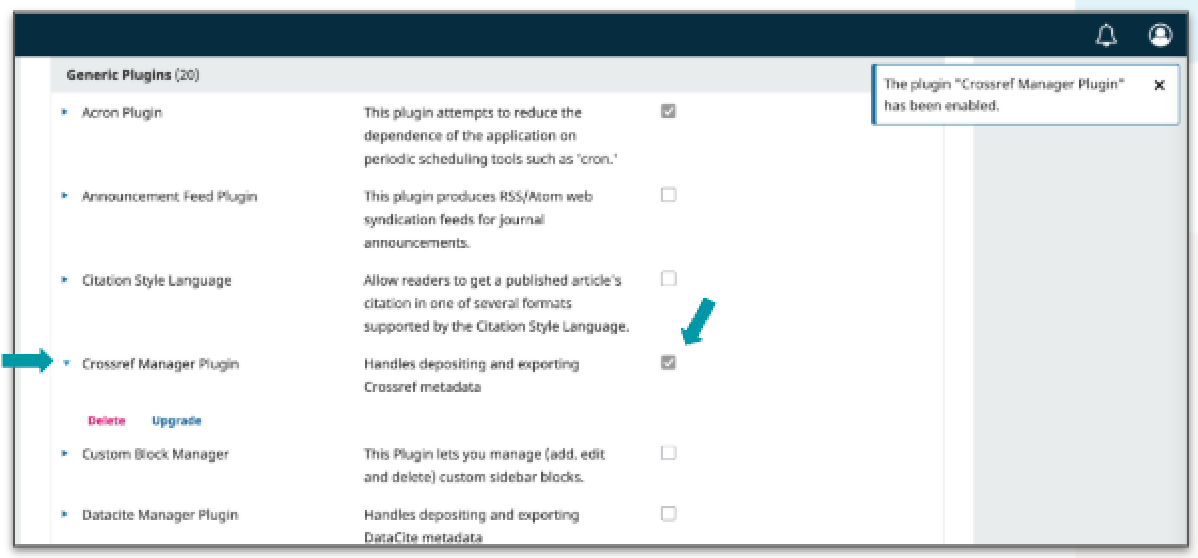
You can register your DOI records with us using the OJS (Open Journal Systems) platform by enabling the Crossref Manager plugin. We highly recommend including your references in the metadata you send to us, too - you can do this by adding the OJS references plugin. The instructions below are for configuring OJS version 3.4 (more in Public Knowledge Project’s (PKP) documentation).
As Journal Manager, under Settings, click Website > Plugins.
Under Installed Plugins, scroll down to the section labelled Generic Plugins.
Click the checkbox next to the plugin description to enable the plugin.
Step 2: Setting up automatic DOI registrations in OJS 3.4
Go to the Distribution menu
Select the DOI tab
Click on the Setup option
Check the box to allow DOIs to be assigned to your published works
Check the box to determine which items DOI will be assigned
Enter your Crossref assigned DOI prefix. Your prefix will start with 10. and is in the format 10.xxxx (e.g., 10.5555).
Select your preferred stage for automatic DOI assignment to your articles (can be upon the article reaching copyediting stage or upon article publication).
Select your preferred method of DOI suffix generation (can be Default, None for manual entry of suffixes, or Custom pattern)
Next, switch to the ‘Registration’ tab menu
Select Crossref your ‘Registration Agency’ from the drop down options. If you don’t see “Crossref” in the list, navigate to Website > Plugins > Plugin Gallery to enable the ‘Crossref Manager Plugin’.
Check the box under ‘Automatic Deposit’ to enable automatic DOI deposits from your OJS instance.
Enter your name here as the depositor.
Enter your email here as the depositor (all deposit emails will be sent to this email).
Enter your assigned Crossref username. For example [email protected]/abcd
Note: if the combination of username and password is incorrect, OJS will return a ‘401 unauthorized status code’ error at the time of registration. This error indicates that the username and password are incorrectly entered. That is, they do not match the username and/or password set with Crossref.
If you are using organisation-wide, shared role credentials (i.e. your username is a collection of letters), you can simply add in your shared username and password.
If you are using personal user credentials that are unique to you (i.e. your username is your email address), you’ll need to add your email address and your role into the username field, and your personal password into the password field. Here’s an example of what this will look like:
Enter your set personal password into the password field.
IMPORTANT: Leave the test checkbox unchecked.
Step 3: Activate the OJS references plugin
The OJS references plugin is available from OJS 3.1.2 onwards. The plugin will use the Crossref API to check against plain text references and locate possible DOIs for articles. The plugin will also allow the display of reference lists on the article landing page in OJS and deposit them as part of your metadata deposit. Linking references is a requirement of Crossref membership.
Workflow Settings
Click ‘Settings’ and then ‘Workflow’ from your dashboard
Under the ‘Submission’ tab, choose ‘Metadata’!
Scroll down to the bottom and find the ‘References’ section
Make sure you enable references metadata by clicking the checkbox ‘Enable references metadata’. You also need to select the option ‘Ask the author to provide references during submission’.
Click save!
Website Settings
Then you need to activate the references plugin on the website, too, by following the instructions here:
Click ‘Settings’ and then ‘Website’ from your dashboard
Choose the ‘Plugins’ tab.
Search ‘Crossref reference linking’
Click the ‘Crossref reference linking’ checkbox
This plugin will deposit the references that you enter into the XML deposit.
Additional OJS plugins for Crossref
In addition to the Crossref XML plugin for OJS, there are also other important plugins that can be enabled in OJS to enrich your metadata records:
Funding Metadata plugin - as of OJS 3.1.2, it is possible to enable a funder registry plugin for submitting funding information to Crossref. The plugin will use the Open Funder Registry to check against existing funding agencies. The plugin will include funding information in your Crossref DOI deposits.
Similarity Check plugin - if you are using OJS 3.1.2 or above, you are able to use the Similarity Check plugin. This will enable you to automatically send manuscripts to your iThenticate account to check their similarity to already published content. You will need to be subscribed to Crossref’s Similarity Check service for this to work.
ROR plugin - the ROR Plugin for OJS enables authors to add the ROR ID for the organization they are affiliated with.
Getting help with OJS plugins
The team at Crossref didn’t create these plugins - they were either created by the team at PKP, or by third-party developers. Because of this, we aren’t able to give in-depth help or troubleshooting on problems with these plugins.